


.")


 (photo © David Teichman 2014)")

Python-class self-propelled couch. It's a rather fast and comfortable lowracer which doesn't mind headwinds, can go under turnpikes and allows to keep pedaling in even the tightest turns. A specific feature of this design is leg steering and dynamically unstable geometry with a negative trail, which needs totally different approach than any other bike and is unridable without several weeks of training. All Python theory can be found at websites python-lowracer.de and openbike.org. Pythons are not manufactured commercially (no wonder), so the whole world's production is limited to homebuilt originals. As far as I know, there are five of them here in the Czech republic.
My prototype consists of higly overbuilt frame and a mismatched mix of low-end (read: junk) components because it was more an experiment than a serious bike. For a Python, it has greater-than-average cargo capacity (including a trailer hitch). On the other hand, it has no suspension. Except the pedal reflectors, it conforms to standard mandatory equipment including lights. It first rolled out in spring 2012 and it took another two years to iterate to its definitive version. Since spring 2016 it has a new owner.
Python frame consists of two halves with a steering joint in the middle. Front wheel, transmission and handlebars are on the front half, rear wheel and seat are on the rear half. Steering axis passes through rider's hips, so that the whole legs turn together with the front wheel. That allows reasonably wide steering angles without legs or pedals interfering with anything (90-degree turn on a two-metre-wide sidewalk is no problem). The chain is of standard length (or even shorter) and doesn't need any idlers. In addition, it's far from most dirt spray areas.
A bike with a negative trail is dynamically unstable, so all stabilization must be taken care of by the driver. The bright side is that wheel flop is also negative - front wheel automatically returns to the neutral position (due to steering axis angle). To make balancing more fun, three things complicate it: low centre of gravity causing the bike to lean very quickly, steering sensitivity growing with speed, and legs having to pedal and steer at the same time (hands can help with feedback and fine tuning, but the legs are stronger). This is all possible to learn, but you start from scratch because it has nothing in common with standard positive-trail bikes.
From the construction point of view, a Python is brilliantly simple and can be made without lathes or mills. My requirements were rather simple: an easy to build, robust and fast touring bike. The frame is welded from mild steel rectangular tubing and several bits of scrap standard frame. I was learning to weld in the process, hence the looks. The wheels are standard 26", they are just swapped. The other parts were salvaged from our basement junkyard or bought new.
Wheel diameter is limited by rider's leg length, wheelbase was limited by storage hook height at our bike parking lot (1.8 m above the floor). As soon as these dimensions are clear, we can estimate forces in the steering bearings:

     G*WB
F = ------
     4*D
The calculation is simplified, it doesn't account for actual frame geometry. In reality, the axis is closer to front wheel and the rider's weight spreads over larger area, so the actual forces will be smaller. But a little bit of overbuilding is a good idea here - the load is highly dynamic, a bumpy road can generate big spikes.
Materials used:
Total price of the material and parts reached something about 5000 CZK (a price of a very cheap supermarket "bicycle"), later modifications and upgrades cost another thousand or so.
Tools and equipment used:
First step was welding practice. Last time I had used a welder at high school practical classes (about nine years ago), the results were not pretty. So some electrodes and iron pieces had to perish gloriously until I stopped to fear the sizzling arc and developed some feel in my paws.
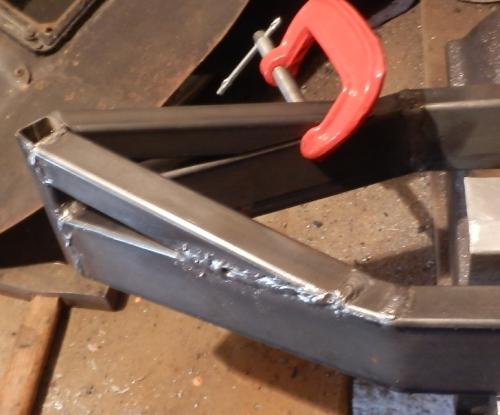
I began the construction by the front half of the frame, as recommended by Python designer Jürgen Mages. First I tack-welded the dropouts with the wheel mounted in them (covered in rugs to avoid damage by hot slag), a scrap axle of the same width was holding the geometry during the final welds, as you can see on the first photo.
Then the beams were bent to the final shape. Several competing requirements needed to be met. Front ends must be close together enough to be narrower than the bottom bracket shell. They must converge under an angle shallow enough to clear the cranks (they didn't clear them at the end and I had to cut off some superfluous plastic from the cranks). The bottom bracket must be as close as possible to the wheel, so that I can reach it with my legs. But at the same time the beams must be far apart enough to clear the wheel and its two-inch tyre. The last condition was impossible to meet, hence the cutouts on the inner sides. Rear end was easier - there are no cranks, so the angle of convergence can be rather steep. The only limit is strength, so I wanted to have the bends as far from the steering joint as possible.

I cut the first bend by trial/error method, but it took to long, so I derived this simple equation:

     H*B
W = -----
      L
It can be applied for angles small enough to have roughly sin(x) = tan(x) = x.
If the cutout ends up being too wide, it can be solved this way:

Electrode stumps with the coating removed work for this as well. Gaps and holes are dangerous, the material tends to melt around them and instead of a weld, you get a bigger hole.
First tack of the bottom bracket, upper side:

Old BB cups are screwed into the shell to prevent deformations during welding. Of course, the actual bearings can't be used for this, high temperatures would destroy them. The derailleur tube should lean backward more; I didn't know that during the build.
Rear end:
The vertical bit and the two sloped struts are 20×20 tubes. Main 40×20 beams would carry the bending moments without trouble, but steering bearings must be spaced as far apart as possible to minimize their load. Later I ground and re-welded those ugly beads.
Front end after final welding:

Those beads are almost a centimetre thick, but I don't mind, they must be strong. The rusty lever welded to the left cup works as a wrench - the BB shell shrunk and the cups couldn't be unscrewed by hand.
Now we are getting to the rear half of the frame. Here is one exceptionally neat weld:

Main beams are 40×20 again, angled struts are 20×20 and the vertical tube in the middle is 30×30 with 3 mm thick walls - steering bearings are to be screwed into it. This way:

Inner nut of the upper bearing is welded inside the tube, the lower bearing is slightly movable to allow fine adjustment. Steering axle is a 12 mm precise rod (h7 or something). It runs through two 4 mm thick sheets on the front frame (the more precise the holes are, the better the load distribution). This is how it looked after first tack-weld (preceded by several hours of careful jigging, alignment and assembly):

Steering axis angle is 65° (exactly by the instructions), a nicely strong centering moment is the result. Next photo was taken some time later, after final welding of front flanges, and cutting and tapping the axle:

Final adjustment of the bearing distance is very tedious because the required precision reaches fractions of a millimetre. But it is a one-time task, no further adjustment is needed until the bearings need replacement.
The necessary front mudguard went next:

This aluminium one is all that was available in our local bike shop at the moment. It's rather narrow, but it fits the frame just fine, so there was probably no better choice. Later I extended it by aluminium sticky tape to get rid of dust between my teeth. The stays are welded to the frame, I was too lazy to adapt them for bolting.
Next step: the seat. Upper end of the vertical central tube luckily ended in the exactly correct place, so I just drilled a hole through it and made two brackets of 3 mm sheet. Rear end of the seat base is held by a sloped crossbeam 20×20 mm which doesn't have to be this long. All bolts are M8.

By the way, the two lonely vertical welds on the outer side of main beams compensate material tension. Four welds around a little crossbeam in front of the wheel caused the fork to shrink, the compensation beads expanded it to the original width. I don't worry about strength, the frame is still overbuilt.
First version of the back rest:

The string is a clothes line with some wires in the core, nylon fibres around them and plastic coating. It failed after 180 km, so I replaced it with another one that had the steel core as thick as a brake cable. Vertical strut in front of the wheel (20×20 tube) was planned to be straight, but it didn't fit, so I bent it this way, at least there is more cargo space left under the seat. Rear seatstays Ø12 are transplanted directly from the donor frame, welded to the crossbeam by the top ends. The back rest was too far back and I couldn't reach the pedals from there, so I drilled new holes and moved it as far forward as possible:

Here you can see the handlebars too. The stem (or whatever you call it) is vertical piece of 40×20 tube, the clamp is cut from the wall of the same tube (T 2 mm), threaded cubes for clamping bolts are cut from a fence rung. The spot atop the front frame was the only choice, the handlebars wouldn't fit anywhere else. Later I welded a short bead between the bolt heads on the clamp to increase stiffness and replaced the slotted bolts by inner hex ones, because there is not enough space for a screwdriver under the seat. Strength of the resulting setup is OK, the handlebars survived (among others) a crash landing in 40 km/h. Some time later I drilled through the clamp, tapped it to M4 and screwed a bolt in to prevent the bars from tilting.

Our thirty-years-old MEZ Brumov welder I'd been using for the build passed to the silicon heaven (or maybe copper and iron heaven in this case) at this point. Diagnosis: some of the coils shorted out, not repairable at home. So I headed to our hardware store for a new machine - Omicron Gama 166 (on the right):


Transition from AC to DC, from stepped current selector with a minimum of 60 A to a smoothly-adjustable knob from 10 A up, from sticking electrodes to hotstart and from thirty-kilogram transformer to a five-kilo inverter was very pleasant.
With the Gama, I'm able to weld one-mm thin tubes, so I didn't have to improvise the rack in any way and assembled it with standard butt welds (those two red rungs are remains of old seatstays, used when I ran out of tubing):

The rack ended up a little twisted, but the panniers don't mind. It's stronger, stiffer and surprisingly lighter than some commercial types made of solid rods. Rear mudguard stay is welded to the frame again. Head rest is made of Ø20×1.5 stainless tube (or something like that) which I had lying around in the basement. It is simply bolted into the backrest strut (not very neatly, there is some play and it rattles). By the way, be careful when welding stainless - the slag shoots around like shrapnel when the bead cools down.
Here you can see rear brake stubs on the bottom of the frame, they were cut off the black fork in the background. The available space was just perfect for an old centre-pull cantilever brake (no need for anything stronger here). Cable stop fits neatly on the seat crossbeam (and I couldn't resist to take picture of this three clamp composition):

The stop is a 4 mm thick rectangle with a threaded hole for an adjusting barrel stolen from an old caliper brake. There's also a slot allowing the cable to be disconnected without disassembling the brake. All remaining cables are on the front frame, so if there weren't the electric wires, the bike would be quite easily separable into two halves.
Front brake is a sturdy V, I wouldn't risk anything weaker. The stubs came from another scrap fork and are welded on small consoles because front fork is much wider than the rear (and there was no other available spot for this brake). Here are the two frame parts shot when primer was drying:

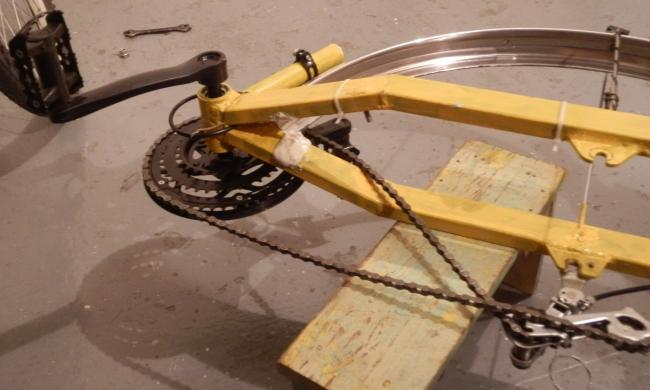
I chose a screaming "excavator yellow" for the top paint. When everything was dry, assembly took place and the bike was walked home from the workshop (I was unable to ride it then) and parked on a hook in the basement:

It was very close, I had to shorten the hook by a centimetre or so to get the taillight off the floor. Front derailleur cable is not present on this picture because I had to buy a longer one. Now it runs along the top side of the left beam, does a 270 degree turn around the bottom bracket and stops on an adjusting barrel (again from an old brake) screwed in the small plate in front of the mudguard. Tapping this hole was the worst chore of the whole build: it's short, sloped and there's not enough space for a handle, so I had to turn the taps by pliers.
Last things to install were handlebar grips, speedometer, temporary seat padding (which became permanent after all), front mudflap and foaming all open tube ends and holes (see picture below), but I was already in the process of learning how to ride.

Configuration of the bike took over a year to finalize. Many modifications were done:
The only thing I miss is a kickstand, but there is no place for it, so the bike is going to stay without one.
First steps couldn't be called riding. Someone described it as walking on my hands while laying on a bike (it was great fun for me and everyone around). After an hour or so, I managed to map the connections between various muscle movements and bike responses and tried to apply standard bike control algorithms on them.
The greatest success of the second day was riding two metres at once without touching the ground. I had no control over the direction of travel though, the bike was turning wherever it wanted to go. I was on the ground more often than in the seat. It's good to practice on a grass: its resistance helps keep the legs working, and falling doesn't hurt.
Third day: five metres in one go and I was able to lay my hands on the handlebars. Hooray! Weird thing is how the new skills soak in during sleep: I didn't feel any progress during the training, but the other day everything went much better.
On the fourth day I'm able to roughly choose the general direction of travel.
On the fifth day I'm able to follow a straight road (just an empty driveway behind our house), wobbling from edge to edge.
On the next two days I ride in a park and scare poor pedestrians and skaters by constant wobbling. Finally I became able to keep on my side of the road and learnt to turn.
Then about three days on an empty 4 km long road behind the town, with a small hill at the end. I practiced riding at faster gears and finally did my first shift while riding (until now I was too afraid to let the handlebars go and reach for levers). Then I had to adjust front derailleur because it refused to shift to the smallest ring and rubbed on the chain.
Then one evening in another part of the park: narrow pathways, loose surfaces, sharp turns, short steep hills and passing between roadblocks. Turning, shifting, stopping, starting etc. until I felt confident enough.
Next day I finally took off for a meaningful destination: first to an ironmonger for one low M12 nut (for the mudflap), then to a bike shop on the other side of the town where I tried to find small panoramic mirrors and a little different front derailleur (both unsuccessful, I found the mirror much later in a car shop). After returning home, the speedometer reports a total mileage of 60 km.
Well, it's time for first serious ride on a public road. I chose my favourite trip to a village 9 km far, with a delicious mineral water spring. Sleepy Sunday morning, a little gloomy - perfect, roads will be empty. And they were, I met no more than three cars during the whole trip. To combine fun with utility, I loaded 12 litres of the mineral water and turned home. The bike became even wobblier than before, but otherwise it was OK. It took 75 minutes to ride the 18 km - much to catch up, I do it under 50 minutes on a road bike.
Next weekend, the same route, one litre less load. The balance improves, I almost don't feel the cargo. Speed goes up as well, I finished in an hour. But I still have to fully concentrate on the driving and it's tiresome.
Another week, another try. I decided to test how fast the bike can go on one long downhill. After scraping myself from the asphalt, fixing knocked mudguard and cleaning up spilled blood, the speedometer reported top speed of 41 km/h. I'm going to stick with 30 for now, just to be sure.
Several weeks later. Saturday afternoon, nice weather, although windy. I set off for a 40 km trip. Stability improves and the balancing program slowly moves to the background, so I can enjoy the view or think about navigation during the ride. I use the lowest gear for the first time in the hills.
After 500 km I start to feel really confident. Pulling a sixty-kilogram trailer is no problem.
One year later (end of summer 2013), total mileage 812 km. I ride my 19 km "water run" 1 km/h faster than on a road bike. Switching to 7-speed cassette pushes the speed up by another kilometre. I plan a longer trip for spring.
February 2014: the bike is in almost final configuration and crosses its thousandth kilometre. I now consider 40 km/h a comfortable speed, fear doesn't appear before fifty. Top speed so far is 57 km/h (coasting downhill with a tailwind). I wonder if there are any limits. Average travel speed varies between 25 and 28 km/h, depending on trip length and air pressure in the tyres.
May 2014: after a long hesitation (I don't like special cycling clothes and shoes) I switched to SPD pedals. They cured the Achilles tendon pain I got during a 200 km trip in March, increased speed and improved safety - now the feet can't fall off the pedals. Mileage reaches 2000 km and grows bloody fast.
June 2014: 3500 km, 426 of that during K24 24-hour marathon (my first bike race ever). It seems the Python is definitely tamed and can't surprise me in any way. I don't need to think about balance, I can even ride with my eyes closed for a while. I routinely put both hands off the bars when I approach crossroads and need to shift and indicate at the same time (or when unpacking a snack). I recovered from a short rear wheel skid at 40 km/h. Top downhill speed got pushed to 71 km/h, average speed on short trips exceeds 30, on long trips it hovers around 27. Minimum uphill speed is still around 10 km/h, stability and maneuverability at low speeds stays poor. Optimum cruising speed is around 30, it's possible to steer with the same precision as on a classic-geometry bike, including extreme situations like following an edge of the road with an overtaking lorry several centimetres from the left handlebar (yes, this happened). So I'm done here, there's nothing more to learn, just the engine power can be improved. It's time to build a new machine and start all over again :-).
May 2016: total mileage 6916.7 km, last years being completely crash-free. Absolute speed record was 73 km/h. The Python finally moved to Moravia and I'm warming up my welder again.
For a first try, the result is not bad: the Mule is a fully functional bike with a speed of a high-end road bike, cargo capacity of a two-rack expedition bike, comfort of a couch and price of a supermarket junk (if we don't count the work).